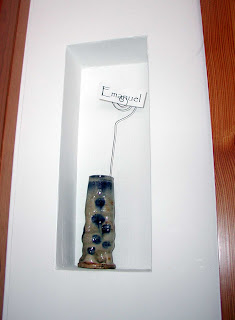
Another year goes by so fast! It's been a fun one though!
We woke to another lovely snowy morning with the pines weighed heavily in snow. It was beautiful! A snow plow had pulled our phone line off our house so no phone or internet all day. The kids enjoyed the packing snow and had fun with their snowman family making project. I worked on a few fabric bird sculptures while enjoying watching a BBC Jane Austen Pride and Prejudice. My husband gave me a collection for Christmas and even though I am familiar with these stories it is nice to watch these versions.
These are a few of the birds ...
A cute treasury to share!
Monday, December 31, 2007
Sunday, December 30, 2007
Road trip to New York City
I hope everyone enjoyed a nice holiday! Ours was a bit hectic and I don't feel we have quite recovered yet. But it was fun too!
Yesterday we took a road trip to New York City to see a show and wander about a bit. We took the train in from Connecticut in the early morning and met up with the uncles in Times Square. It was incredibly crowded in Times Square. It must be because its getting so close to New Years! We ended up seeing "The Grinch". It was a fun show for the kids and we had good seats too. Then we wandered through the crowds to Rockefeller Center to see the skating. And the Fifth avenue with a stop at the "American Girl" store. It was pure chaos.
Monday, December 24, 2007
Thursday, December 20, 2007
Getting into the spirit of Christmas, crafting and cleaning house
I'm making slow but steady progress on the doll as more snow comes our way. I hope to attach the arms and legs to the body today and crochet a little hair "cap". I'll add the eyes and mouth tonight once I quiz my daughter again on the eye color. I think she wants the eyes closed like Annie.
Meanwhile I am cleaning, and dusting, and vacuuming, and dusting, and dusting, and dusting .... Ugh! This is not my favorite thing to do. I know I'm whining about this a little but this kind of job is never ending.
I have one little wee folk doll finished. She is pretty cute with a little acorn cap. Now I just have to finish a few more and make a little woodland house for them. Hmmm.....
I can't help enjoying the pretty scene outside with the snow falling (... again).
Wednesday, December 19, 2007
Getting into the spirit of Christmas, crafting for my family!
Last night I finally sat down to start on a "friend" for Annie Ootie. Annie is my daughter's waldorf style doll and she wants a friend. At first this friend was going to be a little boy but now it looks like it will be a girl named Rosie. I have the head finished and the cloth cut out for the body, legs, and arms. I am using the Magic Cabin doll kit again. I think Rosie might end up as an Annie's twin since my daughter indicated that black hair was not acceptable. The only other I have right now is blond.
Guests are showing up for Christmas on Friday and I am seriously behind on the house cleaning. So I know I will be busy working on this for the next few days too. Also we need to start thinking about what we might have for Christmas dinner.
Though I love the snow I am silently cursing it now. Having a rather short driveway I need to make room for at least two cars along the road. That means digging out a two foot (at least) snow berm that is pretty frozen. I am hoping the small snow storm in the immediate forecast is small!
Similar to JRR Tolkien's Father Christmas letters, Santa writes and draws letters to our children. Each year is a continuing story of Santa, the elves, Polar Bear, and his good friend Penguin.
Sunday, December 16, 2007
Getting into the spirit of Christmas, more baking!
We enjoyed a fun holiday gathering at a good friends house last evening. There was so much delicious food and wine and a warm fire and good conversation. The kids enjoyed a "yankee swap" but this time it was with toys they no longer used. This was an impossible task for my kids since they never want to part with anything. But in the end this little event was really a lot of fun. We woke up this morning to a snowy day. Nothing better than being cuddled in a warm home on a snowy day with no where to go!
Today we were busy making our Norwegian Krumcake cookies and finishing the lefse.
The Krumcake is our favorite Christmas cookie. When I was young my grandmother and great Aunt took turns making these for Christmas. Then later when we were older my mother took over making these with our assistance. We grind our cardamon in mortar and pestle but a pepper mill dedicated to the use of cardamon works good too. We buy the cardamon in its shell and then shell the seeds just before baking. This is my grandmothers recipe:
Krumcake
3/4 lb of butter
1 3/4 cup sugar
8 eggs (beaten)
2 1/2 cups of flour (sifted 3 times) (use 2 cups if batter is dry)
1 tsp ground cardamon (we usually add more especially if the seeds aren't as fresh)
1 tsp vanilla
Melt butter in saucepan then transfer to baking bowl and add sugar, stirring by hand.
Add eggs, cardamon, and vanilla stirring slowly by hand. Then add the flour very gradually to avoid flour lumps (again stirring by hand, we actually sift the flour in the third sift directly into the batter). Just remember do not use an electric mixer
We have a glass cook top so in order to use the heavy Krumcake iron we have the use an separate electric burner. Its important to get the iron hot enough before you start so the batter doesn't stick to the iron. This is really a two person job -- with one person manning the iron and the other rolling the hot cookie into the cone shape with the special wooden cone roller. You just add a spoonful of batter onto the iron and close. The cooking time really is trial and error and every year we cook this is a learning process.
Once the cookies cool off and crisp up they are transferred to a big tin and sealed tight to keep them crisp.
I also finished cooking up the lefse.
The lefse wooden stick is an absolute necessity. You use it to get the rolled out round off the board and transfer it to the pan.
As you can see my lefse isn't completely round but that's ok for me. You can see the bubbles form on the lefse and then its time to turn it over or take it off.
These are the cooked lefse rounds with wax paper in between. When we are done cooking we let them cool and slip the pile in a big ziplock bag and store in the refrigerator or freezer.
While I was busy with the lefse cooking the girls were making a playdough feast for me. Yummy spagetti and chopped liver!
And the third advent ...
Saturday, December 15, 2007
Getting into the spirit of Christmas, making the Lefse!
Yes today is the day we start our lefse! Lefse is a thin soft Norwegian bread that our family enjoys on the evening of Christmas eve. Our family makes a rice pudding and puts a dab of the pudding on the lefse and sprinkles sugar on top. Then we roll up the lefse. We eat it with our hands or at least the kids always have and since I have grown up doing this we continue to do this. For those who don't like rice pudding a little butter on the warmed up lefse with a sprinkle of sugar is yummy too!
My youngest helped me start the Lefse by peeling potatoes with me. Of course we had to do "one potato ... two potato..." to see which potato got peeled next.
The recipe I am following is from The Great Scandinavian Baking Book by Beatrice Ojakangas. I sent her a quick email asking if I could post the recipe here on my blog and she nicely sent me an updated recipe too! She also has Lefse kits for sale on her website for those interested. So here it is:
Lefse Potato Flatbread
Lefse – Norway
2-1/2 pounds Russet potatoes, pared and quartered
1/2 cup (1 stick) butter
1/2 cup whipping cream
2 teaspoons sugar
1-1/4 teaspoons salt
1-1/2 cups all-purpose flour
In a medium saucepan over medium heat, cook potatoes in water to cover until they are just tender, not mushy, about 20 minutes. Pour into a colander over a bowl and drain well. (When the steam rises from the potatoes, you will see a floury-white exterior on the potato pieces). I save the potato water for making bread or use it in soup.
Press the dry, hot potatoes through a potato ricer into a large bowl. Mix in the butter, whipping cream, sugar and salt with a potato masher until very well blended. Note that the flour is NOT added now! Smooth the mixture out in the bowl.
Refrigerate (do NOT cover), at least 8 hours or overnight - this is so that the potato mixture will dry out as it chills.
The next day, preheat an ungreased flat grill to 450*F. Place a clean, large terry towel on a large plastic bag. You will place the baked lefse on one end of the towel and fold the other half of the towel and the plastic bag over the lefse as you cook more rounds. The towel will absorb moisture from the lefse as it cools, and the
plastic keeps the moisture in the towel.
For rolling out the lefse, stretch a pastry cloth over a board and using tape, fasten so that it is taut. Cover a regular or grooved lefse rolling pin with a pastry sock and rub flour generously into the sock.
Remove bowl with potato mixture from refrigerator. Wash your hands well. Add the flour and work it in using your hands. Once the flour is added you MUST roll out and cook all of the lefse, or the dough will get soft and sticky.
Using a #13 ice cream scoop (measures 1/3 cup), portion out the potato mixture and shape into balls. Smooth out the balls and dust lightly with additional flour.
Generously flour the pastry cloth and the rolling pin as well. Flatten the ball of dough and begin rolling it out as thin as you can, adding more flour as you go, being careful not to let the dough stick to the pin or the pastry board. Keep everything dry! Loosen the lefse often, using a lefse stick, carefully pushing it between the dough and the board.
When the round is as large and thin as you can make it, use the stick to pick up the round and transfer it to the hot (ungreased) lefse griddle. The griddle should be hot enough that the lefse immediately begins to bubble. When a peek at the grilled side shows a nice surface of brown spots, slide the stick under it and carefully flip
it over. The stick must be dry so that the lefse will not stick to it and tear.
If the edges of the lefse begin to get dry, brown and curl, you are cooking the rounds too long, and if the lefse is not browning well, but remaining light, the griddle temperature is set too low. If the lefse quickly burns, the griddle temperature is too high. Because all griddles vary a little in their temperature, it takes a little bit of practice to get it exactly the right. Place the cooked lefse onto one end of the terry towel and cover with the other half of the towel, covering at the same time with the other half of the large plastic bag.
Continue rolling out rounds and cooking them, stacking them right on top of each ther in the terry towel (no need to separate them).
Allow the stack of lefse to cool 2-3 hours, then carefully peel each round off the pile, fold it into quarters, and stack them in zipper-lock freezer bags. I like to put 6 to 12 in each bag, depending on how many I think we'll be using at a time. Refrigerate the lefse that will be eaten within the next three days. Freeze the rest.
Lefse is delicious spread with butter and sprinkled with a little sugar, or brown sugar or sugar and cinnamon. Some people roll up the sugared lefse tightly and then slice it into 1/2 inch slices and serve right along with cookies on the holiday cookie tray. Lefse is also delicious just buttered and served with a holiday dinner.
Makes about 20 rounds.
A few photos of our process...
The necessary "potato" ricer ...
The first year we tried this we did so without the ricer and it just didn't work as well. Its important that the potatoes be as dry as possible too!
Now the mixture is ready to cool and dry in the refrigerator overnight.
We have been making these for quite a few years now and some of our techniques differ from the updated recipe above. We don't use an ice cream scoop and just try to get the balls all about the same size. I have a ridged lefse rolling pin that I purchased and this works pretty well as long as the dough is well floured and the rolling pin as well. Its a mess if the dough gets stuck in the ridges. Then I have to use a toothpick to clean it up. We no longer have our pancake griddle and just use a flat non-stick pan on the cooktop. I don't really worry about the temperature so much because I can tell if its working well as I cook and can adjust things accordingly. As we cook our lefse we fold a large piece of aluminum foil on a plate. The lefse goes onto this plate and is recovered between cooking each lefse round. Between each lefse round we place a piece of waxed paper. When we are finished cooking we allow it to cool off and then take the pile of stacked lefse from the aluminum foil and put the whole thing into a large ziplock bag. We usually make them the weekend before Christmas and store them in the refrigerator for a week to 10 days. When ready to use them we take the stack out of the plastic bag and place on a plate and in the microwave for about 20 seconds or so to warm them up. We usually serve them slightly warmed. Everyone takes a lefse round and removes the waxpaper that was left in between each slice.
Tomorrow we will roll out and cook the lefse!
Friday, December 14, 2007
Getting into the spirit of Christmas, cookies!
Well I certainly didn't meet all my goals for the week but what can you do. I haven't started my daughter's doll yet but will start that this weekend. I have been too busy packaging up items for my shop and sending them off before Christmas. I feel like Santa when I stumble into the post office with my bag of boxes!
On Tuesday my friend stopped by and "kidnapped" me on a trip to look for vintage ornaments at the local antique stores. I did feel a little guilty but picked up a few inexpensive ornaments that I love. These tiny colorful glass balls in their original packaging will be treasured at our house.
I also managed to make a batch of cookies for my children's writers group meeting and cookie swap.
Cardamom Almond Stamped Cookies
1 cup (2 sticks, 1/2 lb.) unsalted butter, room temperature
1/2 cup sugar
1/2 tsp vanilla extract
1/4 tsp almond extract
1/4 tsp salt
1/2 tsp ground cardamom seed
2 cups all purpose flour
Cream butter then add sugar and continue beating for another 2 minutes. Stir in the flavorings and salt. Add the flour and blend well.
Refrigerate the dough for 30-90 minutes in a covered container.
Form into 1" balls with your hands and place on lightly greased cookie sheets about 2" apart.
Oil and lightly flour a cookie stamp, press lightly into the dough to make the design. I didn't have a stamp so I used the bottom of a flat glass dipped in white sugar.
Bake cookies at 325°F for 9-12 minutes. They should be firm but not browned. Cool on cookie sheet for 2-3 minutes then transfer them to wire cooling racks.
They came out well and were very easy to make. I am going to look for a cookie stamp or ask my husband to carve one for me. I love the cardamom and almond combination. The recipe is from Scandinavian Cooking.
Most of my flag garlands are hung on the tree and I have a photo to share too!
And last afternoon/night we enjoyed a wonderful snow storm. The girls will be sure to be out this afternoon playing in it after school.
Monday, December 10, 2007
Getting into the spirit of Christmas - The Cards
Yesterday afternoon I finally started on our Christmas card project. My youngest had drawn a few pictures for me to use as ideas for our card. I scanned these into the computer and fixed up the drawing outlines a bit. Initially I was going to print the sketches for her to color but she had a friend visiting and they were outside having fun. At least I think they were having fun because they came inside with fingers that looked as close to frostbite as I have ever seen. Anyone who can ignore that kind of cold must have been having fun. So instead I used the Photoshop to "color" them in a bit.
We were going for simple and this worked out pretty well. The idea was to have a picture of our house and cut "flaps" in the bottom windows and door to open up and show school photos of the girls peeking through. I had to make my daughters windows a little bigger though for this to work but in Photoshop this was fairly easy.
We will add a little glitter to the front card to "sparkle" it up a bit too!
Sunday, December 9, 2007
Getting into the spirit of Christmas, decorating the tree!
My husband always sets up the tree in the stand and wrestles with the tree lights (not an enviable job). Then we girls set about adding the decorations. The tree was tall enough that we needed to use a step ladder. We also secured the tree to the wall (with eye hooks on the window trim and fishing line) to avoid last year's Christmas catastrophe!
This year I am adding more flag garlands like the one hanging on this door.
Many years ago I inherited a small strand of very old paper American flags and have enjoyed setting them up at Christmas every year. Several years ago we made flags from around the world with cut paper. It was time consuming but we enjoyed these colorful garlands on our tree and draped on our lights and windows. But then I had the idea to scan the flags (into my computer) and make a few more. And that is what I am busy doing this year. I have set up the pages in photoshop so I can get many flags on each sheet of paper. I have printed them such that you fold them in the middle, glue and then have a two sided flag. The edges are not lined up perfectly (though close) -- I'm not a perfectionist.
Once I cut out the flags I fold each flag in the middle. I use thread but a thin ribbon would work well too and would be less likely to tangle. With a little white glue on one inside of the flag I then press the sides together with the thread (ribbon) inside at the fold. I try to space the flags evenly and just use a folded piece of paper as my "ruler".
These are the flag sheets that I made up in photoshop. Feel free to use this for your own garlands (but please do not sell them though) if you like them.
Our family happens to be American, Norwegian, Swedish, Italian, and a little Irish, and one of my daughter's is Chinese so I usually print more of these flags. Many of our family Christmas traditions are Norwegian since much of my family was from Norway. There are so many flags I certainly hope that no one feels left out if I didn't include their flag.
During dinner we lit our second advent candle and shared a few family thoughts -- some more thoughtful than others. But holding hands around the table in the quiet candlelight is a sweet moment.
Labels:
Christmas,
decorating,
garland,
tree,
word ornaments
Saturday, December 8, 2007
Getting into the spirit of Christmas, the TREE!
Friday, December 7, 2007
Getting into the spirit of Christmas, the second step!
In reality I have skipped my first step (making our Christmas cards). But I'm not going to let that stop me from going forward. This weekend I promise will make an attempt at that project. I am going to continue our trend of using our children's artwork in combination with a few of their photos.
In the meantime I am continuing my small steps to the holidays. Every year I try a few new handmade decorations to get me in the spirit. I wanted to share one cute idea I had. Being a big collector of driftwood I thought this little card/note holder was a great idea. I had seen many wire holders but none using driftwood. If I had had more time I would have tried making some for my shop but that will have to wait until next year I suppose.
I also made a few more wire "curls" to place in my blue bottle collection in my kitchen "niches". Putting a used wine cork on the end and into the bottle helps them sit up better.
My daughter has a friend named "Annie Ootie". She is an adorable cloth doll in the Waldorf style. This Christmas my daughter wants a friend for her. So next week my plan is to start work on this friend. I think that Annie wants a little boy to be her friend. This time I promised to let my daughter see the process and have some say in the hair and eye color. I have a kit I purchased from Magic Cabin last year and some yarn for hair.
Subscribe to:
Posts (Atom)